
This is the tale of a cheap but attractive trestle table. I wanted to make a servicable, yet portable table for weekend events which would look something like the following image.

My project has some of the usual limitations.
1) Cost had to be minimal
2) Had to be very sturdy when in use
3) Easy to set up
4) Easy to take down
5) Easily fit into the back of my car
This is what I ended up with.
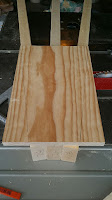
I purchase 4 "standard" 2X4s from the local Home Depot. They were not "clear". I dug through the pile of construction grade lumber and found some rather clean looking boards. The table top was previously created as part of a failed work bench attempt. It was made from an 8 foot 2X12 cut in half and jointed. I purchased 1 quarter inch dowel for pegging the construction together. I also used a scrap 1X10 which I had in the garage about 30 inches long.
I rough cut the legs out.
Note: One of my favorite parts of this project is the massive sense of satisfaction I got doing all this construction with no drawn out plan and no real math. I'll try and explain as best as I can.

My basic layout would consist of a saw horse looking set of legs. Modern saw horses usually have four legs. My trestle would have three. The side with 2 legs would be permanently joined with an "A" shaped 1X10. I layed out the 2 legs with the center board to get a rough size of how wide the top of the "A" would be.


I then spread the legs out so that they would maximise the use of the base of the "A". I then scribed the line for the shape of my "A". So far no math. No angles.
I ripped the "A" and used it as a rough guide as to how large a slot I would have to cut in each leg.

I used the table saw to cut the main line and then finished with a hand saw. The base of the slot was cut out with a hand chisel.


Now having 2 legs with a slot I fitted the "A" in them and cleaned up the joints.


I took a piece of printer paper and roughed out the shape of my decorative cut. I folded the paper in half and then free hand cut the shape with scissors so that it would be symmetrical. I cut the shape out on my scroll saw and then ran the edge on the router to round over the sharp edge.


I wanted the legs to have a tapering profile so I marked out a line on each side of the slot and connected that spot with the bottom corner of the leg. I then "free handed" with my table saw. I can't say that I recommend this but it was the fastest and easiest way for me to do it. I took the rip fence off and the guide and simply treated the table saw as a circular saw. I used both hands to feed the wood through and follow the line. That way I could simply follow the line without having to figure out what the angles are on my guide fence.


Once done I set up my router with a 45 degree corner bit and took the sharp edge off all of the legs.


Pretty fancy and so far still no math or measuring.


As I said my "saw horse" style legs would have 2 on one side and one on the other. The single leg would be constructed much easier than the A frame setup.


This would be the top cross beam for the "saw horse" style set of legs. I knocked a 45 degree cut off the bottom of each end and then used the router on all the edges as well.


I spread the pieces out on the saw table to get a rough idea of the look I wanted. I then scribed the lines for the dado cuts needed.

I don't use a dado blade. I'm really just too lazy to swap it out. I run a cut on each side and then nibble away at the cut until the channel is clear enough. On occasion I may use a hand chisel to clean out the groove, but not too often.


I glued up the legs and then let them dry. I then assembled them. As you recall I haven't done any measurements or math yet. At this point the legs are not even and therefore the table will not sit very well. That's OK. That was the plan.
The legs were only rough cut. I made sure the surface of my table saw was level to begin with. I then set up the table on the top of my saw with a level on it. I kept adjusting and shimming up each leg until my table top would sit level. Once level I marked the bottom of the legs where they should be cut by making sure that my markings were all of equal distance from the surface of my table.

You can see here that once I had the legs shimmed level I marked them by making my line parallel to the surface of the table saw face. This would ensure that all three lines on all three legs were on the same plane. It would also give me the proper angle to cut. This would be a compound angle and math would be involved without this shortcut.


I used a flush cut saw on the top of the legs to smooth out the surface where the table top would sit.


All done, cut, glued and dried. I then drilled the holes for the pegs and pegged the legs together.

Here is what the rough setup looked like.

Construction complete. Works great. My table top needs a little work yet. It is VERY heavy and doesn't seem to want to move around so I don't think I'll need to cut any sort of channels or pegs to hold it in place. Next step is a coat of milk paint for the legs. The table surface will stay natural so that it can double as my work bench surface as well.

Packed for shipment. Breaks down very fast and easy and fits inside the back of my car. Success.

Finished painting the legs. Here are a couple images of the setup. The table surface is about 2 foot wide by 4 foot long. The frame on the table top in the second image is the soon-to-be tabula (backgammon) board.

