
Working on my kit I decided that a new pair of shoes are in order. I have been in the SCA for a bit over 14 years and have converted a couple modern pairs of shoes to late period shoes but other than that I have only created one pair of turn shoes. Shocking! I generally go barefoot. As a woodworker I have no problem with that. When people question why I'm barefoot I refer them to this image:
Well, since I'll be going to Pennsic and camping for a week I thought it a good idea to create a pair of shoes which are more durable than my bare feet. I came across these shoes for sale at $150 and I thought two things. 1) Wow, that's not cheap. 2) I bet I can make those.
 |
| Dorestad: Old Norse Reproduction Handmade Leather |
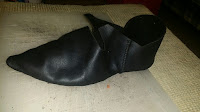
Before I started the process and not entirely sure I wanted ankle boots I kept looking. I came across an awesome site which had this image.
 |
| Where Are The Elves?Adventures in Historic Shoemaking |
I really loved both shoes and could not make up my mind. I had read that the secret to keeping your shoes in good shape is to have 2 pair and rotate them. good idea. I'll make both.
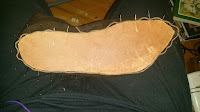
I started by making the very common duct tape template over a pair of old socks. I did the same process for each pair of shoe but I'll only show the one.


I then marked the tape and cut out my rough pattern.


The site containing the second pair of shoes (Where are the Elves) had great step by step photos.... which I didn't follow. I took some short cuts for a couple reasons. The leather I was using was a bit thin and I found that stitching style to be too difficult. I stitched my shoes in a manner which has exposed sewing which I'm not too concerned about. They will be better than most army boots you see folks wearing at events.
I cut the pattern out and then proceeded to test fit them. Using a very "non period" approach I pinned the sole to the upper. I wasn't sure it would fit and had a fear of simply starting to sew. I didn't have a last to work on and thus I used pins. The process worked well enough.

Here is a close-up of the stitching from the outside of the shoe joining the 2 parts of the upper together.

Pinned up and ready for sewing.


So far the I was concerned about the fit of the base. I slipped the shoe on and thought it fit. Turns out it didn't and I hate these shoes. I'll explain later.
Here is what the sole looks like. I used a curved awl to pierce the leather upper through the side of the sole and then used opposing embroidery needles to stitch the shoe together.


The leather I used for the upper was rather soft. It was what I had left over from my satchel I made a while back. I soaked the shoe in warm water for about 5 minutes and easily turned it. Once turned I put the shoe on a shoe makers anvil and lightly hammered the seams smooth.

At this point I was rather happy with the sole and the entire sewing process. I was NOT happy with the fit. As it turns out the pattern for the heal portion was much too large. Next time I'll modify the template and make a felt shoe first to ensure the fit before going through the trouble. The heal is much too loose and the sole is about a quarter inch long.
I tried to run a row of saddle stitching along the top of the heal and then cover it with a light colored decorative trim gathering as I went. This helped snug up the fit a little bit. I will have to wear these shoes with thick hosen for sure. I may go out and buy some modern insoles as well. With modern insoles they will likely fit better and be more comfortable. In any event these will likely be my court shoes or my back-up only shoes. Live and learn...

At this point all I had left was the buckle. I had intended to cast some period buckles but as I desperately hate these shoes I decided to scrounge around instead. I generally keep all buckles, zippers, clips etc from just about anything I buy from Salvation Army or that my wife and kids throw away. These are buckles from an old pair of my wife's shoes. Not strictly period but they are belong on an ill fitting pair of ugly shoes.

My second set of shoes... I LOVE. These went together much easier and fit like a glove. They are absolutely comfortable and came out exactly as I would have hoped. Basically the same process of construction except for the leather toggles I used, instead of buck
This was a one piece upper which had only one seem to assemble. I cut, stitched and pinned to the sole.


Fully stitched but not yet turned.


Soaked for 5 minutes and turned.

I worn them around the house wet until they dried on my feet. since there were not toggles yet I simply tied them on with some string until they dried.

Dried up nicely. I hammered the outside edges of the sole on the shoe maker's anvil.


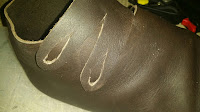
I made some small cuts in the side where I inserted my toggles. I cut small holes to insert the toggle in the flap as a button hole. I then put the shoe on and tightened the toggle. Once I had the proper length I tied a not in the remaining porting of the toggle's tail.


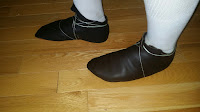
All done, dried and fitted. Worn with a pair of my wool hosen they fit great.


Final step is the finish. I made some cream by mixing 50/50 tallow and olive oil. I use that as a lubricant for my wood working lathe. I simply rubbed that into the entire shoe and let set. The next day I did the same thing. No brushing or polishing done. That sheen is the natural finish now.
